Cooking a brisket flat on a Traeger smoker can be a challenging task, but with the right techniques and a little bit of patience, you can end up with a delicious and tender piece of meat. In this article, we’ll go over everything you need to know to smoke a perfect brisket flat, including how to choose the right piece of meat, how to trim and season it, and what wood to use. We’ll also give you some tips on how to get the best bark on your brisket and how to ensure that it stays moist and flavorful throughout the cook. Whether you’re a seasoned pitmaster or a beginner looking to up your barbecue game, this guide has everything you need to know to smoke a delicious brisket flat on your Traeger.
Set the temperature of your Traeger to 250°F and fill the Traeger pellet hopper with hickory or pecan wood pellets. Cook for 4 to 5 hours or until the meat reaches no higher than 160°F. You can spritz the brisket hourly during the first part of the cook, but this is optional. Wrap the flat in foil and cook until the internal meat temperature reaches close to 200°F Prior to cooking, add two layers of seasoning. First, apply a salt, pepper, and garlic layer before adding a second layer with a barbeque rub.
Key Points
- When smoking a brisket flat on a Traeger, it is best to use hickory or pecan wood pellets and cook at a temperature of 250°F for 4 to 5 hours or until the meat reaches no higher than 160°F.
- When shopping for a brisket flat, look for one with as much marbling as possible and a thin layer of fat on the bottom to help keep the meat moist during the cook. Trim the flat by removing part of the top layer of fat, leaving about 1/4 inch remaining, and removing the silver skin underneath.
- To season the brisket flat, apply a layer of salt, pepper, and garlic followed by a barbecue rub. You can also use a binder, such as mustard or olive oil, to help the rub stick to the meat.
- Fill the Traeger with enough wood to last 7 to 10 hours, and cook the brisket flat at a temperature of 250°F for the entire cook. Spritz the brisket hourly during the first part of the cook, then wrap it in foil and cook until the internal meat temperature reaches close to 200°F.
| Description | Step | Instruction |
|---|---|---|
| Selecting Brisket Flat | 1 | Choose flat with as much marbling as possible. Look for thin layer of fat on bottom to help keep meat moist. |
| Trimming Brisket Flat | 2 | Remove top layer of fat to 1/4 inch. Remove silver skin. Save trimmings for beef tallow. |
| Rub and Seasonings | 3 | Apply in layers: binder (optional), salt, pepper, garlic, barbecue rub. Use mustard or olive oil as binder. Use homemade or store-bought rub, avoiding high salt content if using store-bought. |
| Cooking Techniques | 4 | Fill Traeger with enough wood to last 7-10 hours. Cook at 250°F for entire cook. Spritz hourly during first part of cook. Wrap in foil when internal meat temperature reaches 200°F. |
| Using Wood Pellets | 5 | Use hickory, oak or pecan wood pellets. Cook at 250°F for 4-5 hours or until meat reaches 160°F. |
How To Choose A Brisket Flat
- Look for a brisket flat with as much marbling as possible
- Choose a flat with some fat on the bottom to keep the meat moist
- Consider the USDA grade, with “Prime” being the highest quality and “Choice” being a good mid-range option
- Look for a brisket with a good fat cap, but be sure to trim it down to a reasonable size before cooking
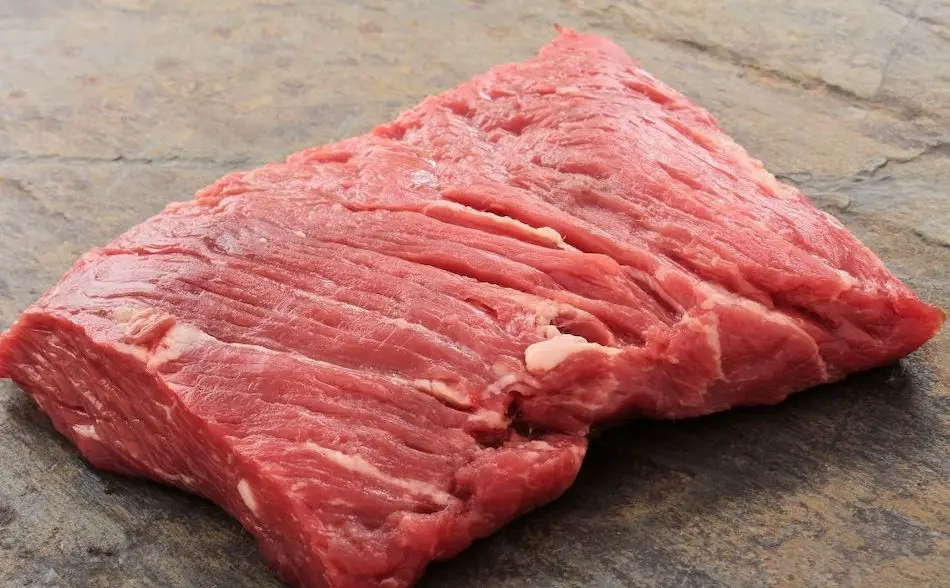
Marbling refers to the white flecks of fat that are interspersed throughout the meat. In general, the more marbling a piece of meat has, the more tender and flavorful it will be. When shopping for brisket, it’s important to look for a flat with as much marbling as possible. This will help to keep the meat moist and flavorful during the cooking process.
The USDA grades beef based on the amount of marbling and other factors, with the highest grade being “Prime.” Prime beef is generally considered the best quality and is reserved for high-end restaurants and specialty markets. It has the most marbling and is the most tender and flavorful. “Select” is the next grade down and is still of good quality, but may have less marbling and be slightly less tender. “Choice” is the third grade and is a good, mid-range option.
In addition to marbling, you should also look for a brisket with a good fat cap. The fat cap is a layer of fat on the top of the meat, and it helps to keep the meat moist and flavorful during cooking. A brisket with a thick fat cap will be more forgiving if you accidentally overcook it, as the fat will help to keep the meat moist. However, it’s important to trim the fat cap down to a reasonable size before cooking, as a thick layer of fat can take a long time to render and can prevent the rub from adhering to the meat properly.
Trim Your Brisket
- Trim off any hard, excess fat from the fat cap and the edges of the flat
- Aim for a fat cap that is about 1/4 to 1/2 inch thick
- Remove any loose pieces of fat or silver skin from the surface of the meat
- Trim the fat cap down to a uniform thickness to ensure even cooking
- Be careful not to remove too much fat, as it helps to keep the meat moist and flavorful during cooking
When trimming brisket, remove part of the top layer so there is 1/4 inch fat remaining. You want to leave some fat to protect the meat so it doesn’t dry out. However, if you leave too much fat, the brisket won’t develop a nice bark. The bark on a brisket is a combination of dehydrated meat, smoke and seasonings. So if there is a thick layer of fat, then a bark won’t form. Brisket flats often have a silver skin underneath. Remove this skin with a sharp knife because it won’t render down. If you want to make beef tallow to baste your brisket, keep all your trimmings. For more on tallow, check out this article: Tallow on Brisket.
Rub and Seasonings
- Use a binder (optional) to help the rub stick to the meat, such as yellow mustard or olive oil
- Apply a layer of seasoning to the brisket, such as salt, pepper, and garlic
- Add a barbecue rub to the brisket, using a commercial rub or a homemade mixture of your favorite spices
- Be mindful of salt content, as over-seasoning can result in a overly salty final product
Seasoning a brisket is an important step in the smoking process, as it helps to add flavor and create a crispy, flavorful bark on the outside of the meat. There are a few different ways to approach seasoning a brisket, but one common method is to use a two-step process.
First, you can use a binder to help the rub stick to the meat. A binder can be something as simple as yellow mustard or olive oil. While a binder is optional, it can be helpful in ensuring that your rub adheres to the meat evenly.
You can apply a binder using yellow mustard or olive oil. A binder is optional and will help the rub stick. A binder isn’t necessary but some people find they help the rub fuse to the meat. You can’t taste the binder. For more information, check out my article: Binder For Brisket.
Next, you can add a layer of seasoning to the brisket. A common combination is salt, pepper, and garlic, but you can also use other seasonings such as paprika, onion powder, and chili powder. Just be sure to go easy on the salt if your rub already contains salt, as over-seasoning can result in a overly salty final product.
Once you’ve applied the first layer of seasoning, you can add a barbecue rub to the brisket. There are many commercial rubs available, such as Slap Yo Daddy or Killer Hogs, but you can also make your own homemade rub using a combination of your favorite spices. Just be sure to go easy on the salt if your rub already contains salt, as over-seasoning can result in a overly salty final product.
There are lots of good rubs out there such as Slap Yo Daddy or Killer Hogs. I prefer to make my own Homemade Brisket Rubs. As mentioned before, just make sure you go easy on the salt if your rub already contains salt.
Standard Barbecue Rub

I found this great rub recipe through How To BBQ Right. I use this recipe and alter it slightly depending on what I'm cooking. Made by the guys at Townsend Spice & Supply: https://townsendspice.com/
Ingredients
- - ½ Cup Paprika
- - ½ Cup Salt
- - ½ Cup Sugar
- - ½ Cup Granulated Garlic
- - ¼ Cup Granulated Onion
- - ¼ Cup Chili
- - ¼ Cup Cumin
- - 2 Tablespoons Black Pepper
- - 2 Tablespoons Dry Mustard
- - 1 Tablespoon Cayenne Pepper
Instructions
- Combine all the spices together in a large mixing bowl
- Store rub in rub shakers
The Best Wood Flavor for Brisket
- Use hickory or pecan wood pellets when smoking a brisket flat on a Traeger
- Cook at 250°F for 4 to 5 hours or until the internal meat temperature reaches no higher than 160°F
- Choose a brisket flat with marbling and a thin layer of fat on the bottom
- Trim the top layer of fat to 1/4 inch and remove the silver skin
- Season with a layer of salt, pepper, and garlic, followed by a barbecue rub and use a binder (optional)
- Fill the Traeger with enough wood to last 7 to 10 hours and cook the flat at 250°F
- Spritz the brisket hourly during the first part of the cook and wrap it in foil when the internal meat temperature reaches close to 200°F
To smoke a brisket flat on a Traeger, it is best to use hickory or pecan wood pellets and cook at 250°F for 4 to 5 hours. When shopping for a brisket flat, choose one with marbling and a thin layer of fat on the bottom, then trim the top layer of fat to 1/4 inch and remove the silver skin.
Season the brisket flat with a layer of salt, pepper, and garlic, followed by a barbecue rub, and use a binder such as mustard or olive oil to help the rub stick. Fill the Traeger with enough wood to last 7 to 10 hours and cook the flat at 250°F, spritzing it hourly during the first part of the cook and wrapping it in foil when the internal meat temperature reaches close to 200°F. The FireBoard is a useful thermometer that can be controlled via a phone and holds 6 meat probes.
According to barbecue expert and competition pitmaster, Myron Mixon, it is important to choose the right wood when smoking a brisket flat. Mixon recommends using a mild wood, such as oak or pecan, to enhance the natural flavor of the meat without overpowering it.
He also advises against using strong-tasting woods, like mesquite or hickory, as they can mask the flavor of the meat. Mixon also recommends soaking the wood chips in water for at least 30 minutes before adding them to the smoker to help control the amount of smoke and prevent the wood from burning too quickly.
Another tip from Mixon is to use a combination of different woods to add depth and complexity to the flavor of the brisket flat. Overall, it is important to choose the right wood and use it in moderation to enhance the flavor of the brisket without overpowering it.
| Expert | Recommended Wood |
|---|---|
| Aaron Franklin | Oak, pecan, or mesquite |
| Tootsie Tomanetz | Oak or mesquite |
| Rodney Scott | Oak |
| JoeDavid Logan | Oak, pecan, or cherry |
| Kenny Callaghan | Oak or hickory |
| Myron Mixon | Oak, hickory, or pecan |
| Chris Lilly | Oak or hickory |
| Melissa Cookston | Pecan or oak |
| Mike Mills | Oak or hickory |
| Ed Mitchell | Oak, hickory, or cherry |
Getting the Temperature Right
- Cook brisket flat at a temperature of 225-250°F to allow for a longer cook time and help retain moisture
- Use wood that complements the flavor of the brisket, such as oak, pecan, apple, or cherry
- Avoid using too much hardwood like hickory or mesquite as it can overpower the flavor of the meat
- Use a meat thermometer to monitor the internal temperature of the brisket and aim for an internal temperature of 200-205°F
- Allow the meat to rest for 15-30 minutes before slicing to redistribute juices and ensure moist, flavorful results
There are a few different factors to consider when determining the best temperature to cook a brisket flat at. One important thing to consider is the thickness of the meat. Brisket flats are generally much thinner than the point, so they may require a lower cooking temperature to avoid drying out. Some barbecue experts recommend cooking at a temperature of around 225-250°F to allow for a longer cook time and help the meat retain moisture.
Another important factor is the type of wood you are using. Different types of wood will produce different levels of heat and flavor, so it’s important to choose one that will complement the flavor of your brisket. Soft woods like oak, pecan, and fruitwoods like apple or cherry are generally recommended for cooking brisket because they burn slower and produce a milder smoke flavor. Harder woods like hickory and mesquite can also be used, but should be used sparingly as they can overpower the flavor of the meat.
It’s also a good idea to use a meat thermometer to monitor the internal temperature of your brisket as it cooks. The meat is done when it reaches an internal temperature of around 200-205°F. At this point, it should be tender and easily pulled apart with a fork. Remember to allow the meat to rest for at least 15-30 minutes before slicing or serving to allow the juices to redistribute. This will help ensure that your brisket is moist and flavorful.
Place the Flat In The Traeger
- When cooking a small brisket on a pellet grill, consider the heat distribution and orientation of the meat
- Place the brisket flat on the grill with the fat side up or down, depending on preference
- Placing the fat side up can protect the meat and keep it moist
- Placing the fat side down can create a barrier between the heat and the meat, preventing it from drying out
- Monitor the temperature and moisture levels of the meat as it cooks, and adjust heat and ventilation as needed to maintain consistent temperature and prevent drying out
When placing a small brisket in a pellet grill, it’s important to consider the distribution of heat and the orientation of the meat. In general, it’s best to place the brisket flat on the grill with the fat side up or down, depending on your preference.
Placing the fat side up can help to protect the meat and keep it moist as it cooks, as the fat will melt and baste the meat. This can be especially beneficial if you are cooking the brisket at a lower temperature or if the heat is unevenly distributed on the grill.
On the other hand, some experts argue that cooking the fat side down can be more effective in preventing the meat from drying out. The fat will drip down onto the heat source and create a barrier between the heat and the meat, helping to keep the temperature more even and prevent the meat from drying out. This can be especially useful if you are cooking the brisket at a higher temperature or if the heat is concentrated in certain areas of the grill.
Regardless of which orientation you choose, it’s important to monitor the temperature and moisture levels of the meat as it cooks, and to adjust the heat and ventilation as needed to maintain a consistent temperature and prevent the meat from drying out.
Spritzing or Mopping the Flat During the Cook
| Mixture | Description |
|---|---|
| 1 part apple cider vinegar, 1 part water | Adds tang and helps to tenderize the meat |
| 1 part apple juice, 1 part water | Adds sweetness and helps to keep the meat moist |
| 1 part beef broth, 1 part water | Adds rich flavor and helps to keep the meat moist |
| 1 part cola, 1 part water | Adds sweetness and helps to create a caramelized bark on the surface of the meat |
| 1 part red wine, 1 part water | Adds depth of flavor and helps to tenderize the meat |
Barbecue experts and competition pitmasters have different opinions on whether or not to spritz or mop a brisket while it cooks. Some believe that adding moisture to the meat can help to form a better smoke ring and improve the bark formation, as well as keeping the meat moist. Others argue that constantly opening the grill or smoker to spritz or mop the brisket can destabilize the temperature and prolong the cook time.
One thing to consider is the fat content of the brisket. A brisket with a thicker fat layer will be more forgiving if you choose not to spritz or mop, as the fat will help to keep the meat moist. A leaner brisket flat may benefit from the added moisture to prevent it from drying out.
When and How to Wrap a Flat
When it comes to wrapping a brisket flat during the cooking process, there are a few different options to choose from. Some barbecue experts recommend using foil, while others prefer butcher paper. The decision ultimately comes down to personal preference, but there are a few key differences to consider.
Foil is a popular choice because it helps to retain moisture and can create a sort of steaming effect, which can be beneficial for a lean cut of meat like a brisket flat. Some pitmasters even add a bit of broth or beef tallow to the foil before wrapping the meat to add extra moisture and flavor. The downside of foil is that it can create a more braising-like effect, which can soften the bark and reduce the smoky flavor of the meat.
Butcher paper, on the other hand, allows the meat to “breathe” a bit more and helps to preserve the bark. It can also be a good option if you want to avoid the foil-like steaming effect and allow the meat to cook more evenly. However, it’s important to note that butcher paper is not as effective at retaining moisture, so you may need to be more diligent about mopping or spritzing the meat to keep it from drying out.
Option 1- Foil
Lay out two sheets of aluminium foil and place the brisket on top. For some extra steam, pour some broth around the brisket just before wrapping tightly in the foil. Another option is to pour some beef tallow on the bottom of the foil. For more information on beef tallow, check out an article I wrote a while back. Tallow will take your brisket to the next-level with the hottest trend in barbeque: Tallow on Brisket.
Option 2 – Butcher Paper
Wrap the brisket in butcher paper. Foil will steam and almost braise the meat. Paper will allow the brisket to breathe more and will protect the bark from going soft. For more on the foil or butcher paper discussion, check out this article: Foil or Butcher Paper?
Insert Thermometer
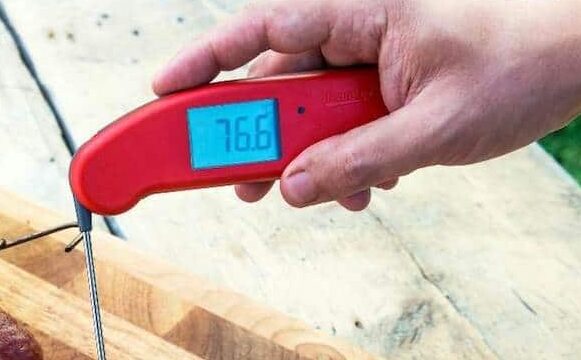
Place the wrapped brisket back into the Traeger and insert your thermometer into the center of the brisket. Keep the temperature stable at 250°F. Cook the brisket until the internal meat temperature reaches close to 200°F. Once the brisket reaches 195°F, probe it with your instant-read thermometer every 10 minutes. Go more by feel rather than internal meat temperature. The brisket should feel like butter when you stick the thermometer inside. The magic number for the perfectly smoked brisket is an internal temperature of 203°F.
- It is generally recommended to use an external thermometer to double-check the internal temperature of your meat, rather than relying solely on the built-in thermometer of your smoker. This is because the built-in thermometers on smokers can sometimes be inaccurate, and using an external thermometer can help ensure that your meat is cooked to the correct temperature.
- To insert a thermometer into a wrapped brisket, you will need to carefully unwrap the foil or butcher paper and insert the thermometer into the center of the meat. Make sure the thermometer is not touching any bones, as this can give an inaccurate reading. Keep the temperature stable at 250°F and cook the brisket until it reaches an internal temperature of around 200°F. You can check the temperature every 10 minutes or so with an instant-read thermometer to ensure it is cooking evenly. Some experts recommend aiming for an internal temperature of around 203°F for the perfect smoked brisket, as this should result in a tender, juicy piece of meat that is easy to pull apart with a fork.
Rest In A Cooler
Resting the brisket in a cooler for a couple of hours after cooking is a common practice among barbecue experts and competition pitmasters. This allows the meat to relax and allows the juices to redistribute throughout the meat, resulting in a juicier and more flavorful brisket. It’s important to wrap the brisket in a towel for insulation to help maintain the heat and ensure that the meat stays at a safe temperature.
Allowing the brisket to rest also makes it easier to slice, as the fibers of the meat will have relaxed and become more tender. Some experts recommend allowing the brisket to rest for a minimum of 2 hours, while others suggest letting it rest for up to 4 hours or even overnight. The key is to be patient and allow the meat to rest until it is fully cooled and has had time to reabsorb its juices.
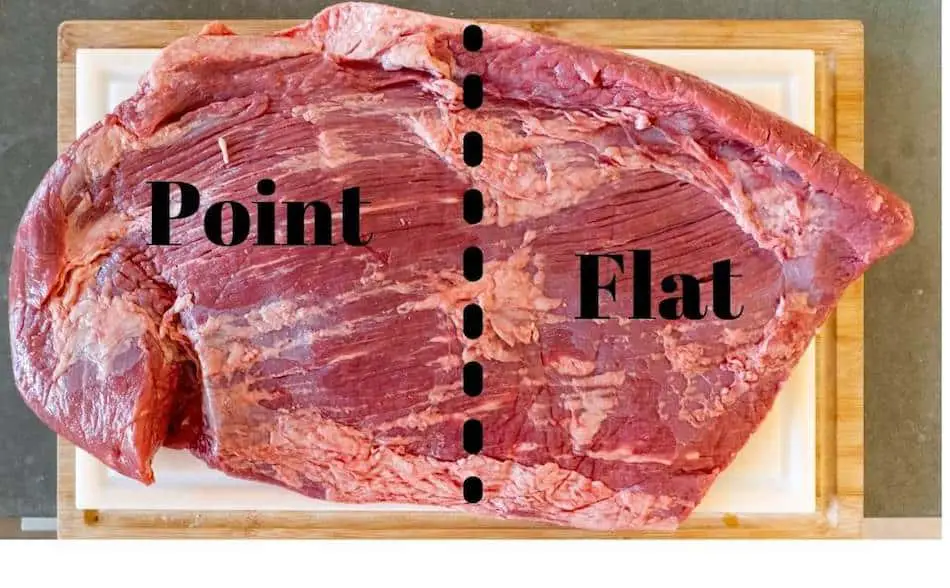
The brisket flat is all muscle which, unlike the point, is lean with little fat or connective tissue. If you don’t cook the flat correctly, it can turn out tough and chewy. There are several techniques you can do to prevent this from happening.
Brine the Flat
Rubbing salt into the brisket the night before the cook will add flavor and prevent the meat from drying out. Take some kosher salt or sea salt and sprinkle it over the brisket flat. Allow at least 2 hours for the salt to work its way into the meat.
Dry brining a brisket involves coating the meat with a mixture of salt, sugar, and seasonings, and letting it sit in the refrigerator for several hours or up to a few days. The dry brine helps to season the meat and also helps to create a crispy, flavorful bark on the outside of the brisket.
Here is a basic process for dry brining a brisket:
- Mix together the salt, sugar, and any additional seasonings you want to use. Some popular choices include garlic powder, onion powder, paprika, and black pepper.
- Coat the brisket evenly with the dry brine mixture, using your hands to rub it into the meat.
- Place the brisket in a large resealable plastic bag or wrap it tightly in plastic wrap.
- Refrigerate the brisket for several hours or up to a few days. The longer you let the brisket brine, the more flavorful it will be.
If you are going to dry brine, withhold salt from your rub otherwise the brisket will get double salted. Brine Brisket?
Inject the Flat
Injecting a brisket flat is a technique used by many barbecue competition pitmasters to add additional moisture and flavor to the meat. The process involves using a meat injector, which is a syringe-like tool with a needle, to inject liquid into the brisket. This liquid can be anything from broth to marinade to melted beef fat.
There are a few key things to consider when injecting a brisket flat. First, be sure to use a meat injector that is specifically designed for injecting large cuts of meat like brisket. These injectors will typically have a larger needle and be able to hold more liquid. Second, be careful not to over-inject the meat. This can lead to the brisket becoming too moist and may result in a less desirable texture. Finally, be sure to inject the liquid evenly throughout the brisket to ensure that it is evenly distributed and that the flavors are balanced.
Amazon sells some affordable meat injectors if you don’t have one, and Butcher BBQ is an award-winning injection solution.
Pan the Flat
When smoking a brisket flat, some barbecue experts recommend using a brine or injection to add flavor and moisture to the meat. Brining involves rubbing salt into the meat and allowing it to sit for several hours before cooking, while injecting involves using a meat injector to add broth or marinade directly into the meat.
Another option is to cook the flat in a pan, which allows the meat to cook in its own juices and helps to keep it tender and juicy. However, using a pan may result in a soggy bark on the bottom of the flat, while the top will still have a decent bark. Some competition pitmasters also recommend cooking the flat on the grill for the first two hours before placing it in the pan to help develop a bark on top. Overall, the key to smoking a brisket flat successfully is to add moisture to the meat and cook it at a low temperature to avoid drying it out.
Recipe: Brisket Flat on a Traeger
| Cooking Brisket Flat on Traeger | Selecting Brisket Flat | Trimming Brisket Flat | Rub and Seasonings | Cooking Techniques |
|---|---|---|---|---|
| Use hickory or pecan wood pellets | Choose flat with as much marbling as possible | Remove top layer of fat to 1/4 inch | Apply in layers: binder (optional), salt, pepper, garlic, barbecue rub | Fill Traeger with enough wood to last 7-10 hours |
| Cook at 250°F for 4-5 hours or until meat reaches 160°F | Look for thin layer of fat on bottom to help keep meat moist | Remove silver skin | Use mustard or olive oil as binder | Cook at 250°F for entire cook |
| Spritz hourly during first part of cook, wrap in foil when internal meat temperature reaches 200°F | Save trimmings for beef tallow | Use homemade or store-bought rub, avoiding high salt content if using store-bought | Spritz hourly during first part of cook | |
| Season with salt, pepper, garlic, and barbecue rub; use binder such as mustard or olive oil to help rub stick | Wrap in foil when internal meat temperature reaches 200°F | |||
| Fill Traeger with enough wood to last 7-10 hours | Use advanced thermometer like FireBoard to monitor temperature and manage cook data |
My Favorite Brisket Tools
Thanks for checking out this article. I hope you learned a few things. Here are some of my favorite tools I use when smoking brisket that may be useful to you. These are affiliate links, so if you decide to purchase any of these products, I’ll earn a commission. But in all honesty, these are the tools I recommend to my family and friends who are just starting out.
Meat Injector: Injecting meat is a great way to take your barbecue to the next level and help you make competition-style brisket. An injector is the only way you will be able to get flavor and moisture into the middle of the meat. The Beast Injector is a stainless steel injector that is sturdy and affordable. Check the latest price on Amazon here.
Brisket Marinade: The best injection solution on the market is the Butcher BBQ Brisket Injection. This marinade is used in competitions and is made by World Barbecue Champion pitmaster, Dave Bouska. You can find the marinade on Amazon here.
Butcher Paper: Wrapping brisket in butcher paper has become a huge trend in barbeque thanks to Aaron Franklin. Wrapping your brisket in paper will give you a nice brisket bark. However, you can’t just use any old paper, it has to be unwaxed, food grade paper. You can find it on Amazon here.
Brisket Rub: These days I make my own rub when possible, but I always have a few pre-made rubs for when I’m running low. Barbecue guru Malcom Reed produces Killer Hogs, one of the best brisket rubs I’ve found over the years. Another great rub is Slap Yo Daddy, made by brisket master and multiple World Barbecue Champion, Harry Soo.
Meat Thermometer: There are dozens of fancy thermometers on the market, but I still use my trusty TP20. For around $50, I have a high-quality meat thermometer with two probes, and can track the temperature of my smoker with one probe, and my meat with the other probe. The ThermoPro TP20 is an Amazon Best Seller because it’s the easiest thermometer to operate, is durable, highly accurate, and comes with pre-programmed meat settings.
Instant Read Thermometer: Arguably, the second most important tool you need is a fast and accurate instant-read thermometer. These tools play an important role in the latter stages of the cook when the meat needs regular checking in multiple areas. I use the ThermoPro TP19 because it can do everything a ThermaPen can do, but for a fraction of the cost. You can check out the TP19 on Amazon here.
Advanced Thermometer and Automatic Temperature Controller: Once you’re ready to take things seriously, the FireBoard 2 Drive is a six-channel Bluetooth/Wi-Fi thermometer that can monitor up to 6 pieces of meat, control and graph your cook sessions on your smartphone, and attaches to an an automatic blower that will convert your charcoal smoker to a set-and-forget. This is one of the most advanced meat thermometers on the market. You can check it out on the FireBoard website here.