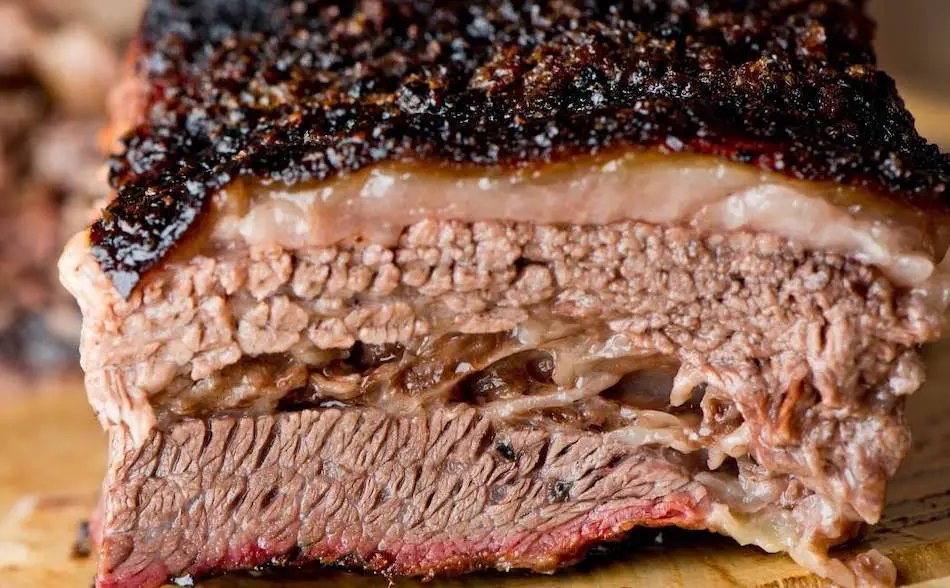
Brisket is a flavorful and versatile cut of beef that is amazing when smoked low-n-slow. But did you know that a brisket is actually made up of two distinct muscles – the point and the flat” These two muscles have different characteristics and require different cooking techniques to bring out their full potential. In this article, we’ll explore the differences between a brisket point, a brisket flat, and a packer brisket, and delve into the best ways to cook each one.
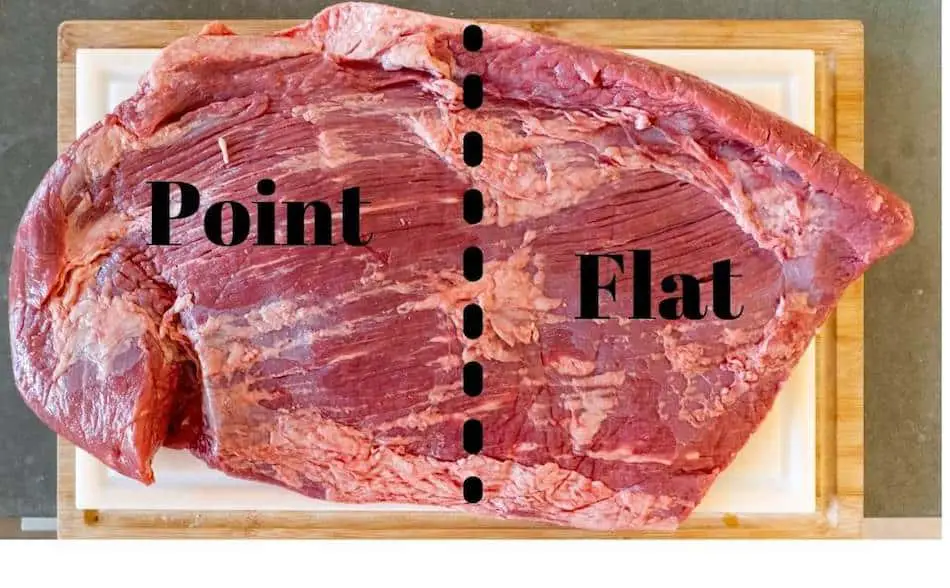
The brisket point is part of the pectoral muscle found on a beef forequarter. Brisket has two muscles; the point and the flat. The point is a thick, round shaped muscle with a lot of fat and connective tissue, whereas the flat is a thin, lean muscle with very little fat and sinew. Most people find the point muscle to be the tastiest part of the brisket, simply because it contains more fat and marbling. The flat has less flavor, and the meat from this muscle is more difficult to cook because it can dry out easily.
Key Points
- Brisket has two muscles: the point and the flat
- The point is a thick, round shaped muscle with a lot of fat and connective tissue, while the flat is a thin, lean muscle with very little fat and sinew
- The point is generally considered the tastier part of the brisket because it has more fat and marbling, which gives it more flavor and juiciness
- The flat is leaner and can be more difficult to cook because it can dry out easily
- Marbling refers to the white, fatty striations in the meat and can impact the flavor and tenderness of the meat
- Brisket is often sold as a flat, point, or whole piece, with points being harder to find in some areas
- The point can be used to make burnt ends, a sticky appetizer made from cubed brisket, while the flat can be cooked separately as a roast
- It can take 8-14 hours or longer to cook a brisket point, depending on the size and cooking temperature
- It’s important to wrap the brisket in foil or butcher paper to keep it moist during the cooking process
A Comparison of Texture and Tenderness
| Muscle | Description | Flavor | Cooking |
|---|---|---|---|
| Point | Thick, round muscle with a lot of fat and connective tissue | Tastier and more flavorful because of higher fat content | Can be used to make burnt ends or smoked separately |
| Flat | Thin, lean muscle with very little fat and sinew | Leaner and less flavorful due to lower fat content | Can be cooked separately as a roast |
The Flat: Leaner and Easier to Cook, But Lacking in Flavor
When it comes to cooking brisket, most pitmasters prefer the point to the flat due to its higher fat content and abundance of connective tissue. The fat in the point helps to keep the meat moist and flavorful during the long cooking process, while the connective tissue breaks down into a rich, gelatinous texture that adds depth and complexity to the finished dish. On the other hand, the flat is leaner and requires more careful handling to prevent it from drying out. Despite its lower fat content, the flat can still be delicious when cooked properly, and it is often sliced thin and served as sandwiches or used in dishes like corned beef.
| Muscle | Pros | Cons |
|---|---|---|
| Point | – More flavorful due to higher fat content and marbling – Tender because of higher fat and connective tissue content – Can be used to make burnt ends | – Takes longer to cook due to higher fat content |
| Flat | – Leaner, lower fat content – Cooks faster due to lower fat content | – Less flavorful due to lower fat and marbling content – Can dry out easily if not cooked properly |
The Point: Fattier and More Flavorful
The point of the brisket contains more marbling than the flat, which is why the point has more flavor, juiciness and is more tender. Marbling is the white, fatty striations found in the meat. Wagyu beef is famous for its marbling and is the reason this meat tastes so delicious. The marbling makes the meat melt in your mouth. When brisket shopping, choose meat with the most marbling you can afford. Beef comes in different grades; Select, Choice and Prime. Select contains little or no marbling, whereas Choice and Prime have a decent amount of marbling. If you want next-level marbling, then Wagyu beef is the best option, although it’s the most costly.
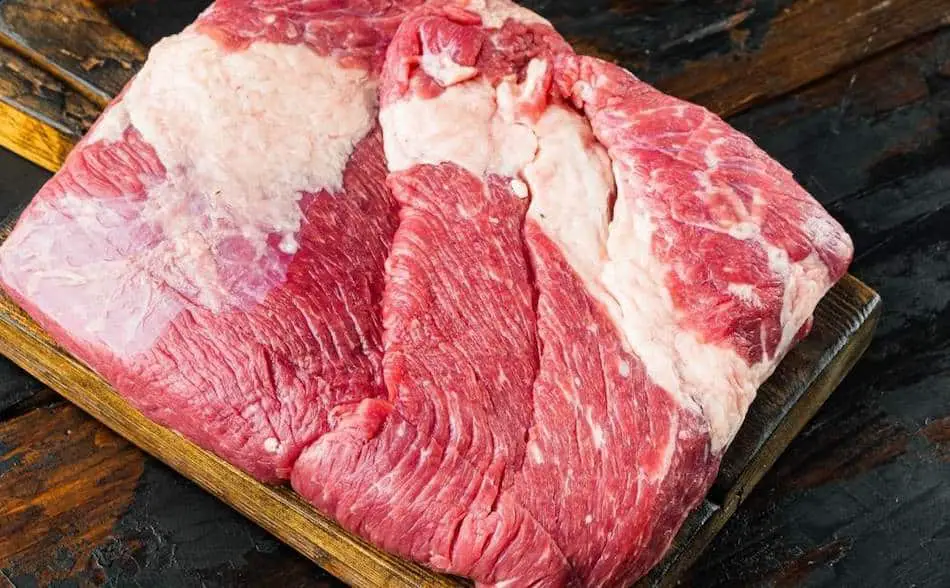
Shopping for a Point
When shopping for brisket, butchers usually prepare brisket as either a flat, a point or a whole piece. In many areas, flats or whole briskets are more common and points are harder to find. If you don’t have points available where you live, you may have to buy a full packer brisket and separate the muscle with a knife. Butchers and supermarkets usually package a brisket in vacuum sealed bags and they weigh anywhere from 7 to 15 pounds. A brisket point by itself will usually weigh between 4 and 6 pounds, even bigger.
Separate the Point and the Flat
When it comes to cooking brisket, one option is to purchase a whole brisket and separate the point and flat muscles yourself. This allows you to cook each muscle differently. To separate the point and flat, you will need a sharp knife and a cutting board.
First, locate the layer of fat that sits between the two muscles. Slowly and carefully slice through the fat, using the knife to follow the natural seam between the point and flat. Once the muscles are separated, you can cook them individually or use them in different dishes.
The point is often used to make burnt ends, a popular BBQ dish that involves slow-smoking the meat until it is tender and caramelized. The flat is typically sliced thin and served in sandwiches or used in dishes like corned beef. Separating the point and flat allows you to customize your cooking approach and achieve the best results for each part of the brisket.
Burnt Ends: Use the Point
The point of the brisket is used to make burnt ends, a delicious sticky appetizer made from cubed brisket point. Burnt ends are a popular barbecue dish made from cubed pieces of brisket point that are cooked until tender and then coated in a sweet and savory sauce. The high fat content of the point helps to keep the meat moist and flavorful during the long cooking process.
The point works much better for burnt ends. It has more flavor because it is much fattier than the flat. To make burnt ends, the point is usually separated from the flat and diced into small cubes before being smoked or cooked in a barbecue pit. The flat is typically cooked separately as a roast.
For more information on smoking a brisket flat, check out this article: What Is A Brisket Flat? If you want to know more about burnt ends, check out: How To Make Brisket Burnt Ends.
How Long to Cook the Point?
It could take anywhere from 8 to 14 hours, even longer to smoke a brisket point. The total cook time depends on the size of the brisket point and the temperature you are cooking. Some people say it takes 1 hour per pound but I haven’t found this to be accurate. There are too many variables when smoking meat. Too many things that can and will go wrong.
How To Smoke A Brisket Point
Trim the fat cap of the brisket point, leaving 1/4 of an inch. You don’t want to trim too much fat because you need a little to protect the meat, and to help form the bark. Remove any silver skin on the underside of the brisket.Brining is optional, however it’s beneficial. Pre brine the brisket with a dry brining method using kosher salt. Then let it sit in the refrigerator overnight. Applying kosher salt to the brisket will help the meat retain moisture while cooking. When smoking meat low and slow, it needs to sit in the smoker for 10 plus hours, which puts it at risk of drying out. Salt will also add an enormous amount of flavor to the meat.
Brisket Point Recipe
| Step | Description |
|---|---|
| 1 | Trim the fat cap of the brisket point, leaving 1/4 of an inch. Remove any silver skin on the underside of the brisket. |
| 2 | Brine the brisket with a dry brining method using kosher salt. Let it sit in the refrigerator overnight (optional). |
| 3 | Apply a binder (such as mustard or olive oil) to the brisket point before adding the rub (optional). |
| 4 | Sprinkle a thick layer of rub on the outer layer of the brisket point. |
| 5 | Set the temperature of your smoker to 225°F. |
| 6 | Wrap the brisket point in foil or butcher paper once the bark has set and is firm. |
| 7 | The brisket point should be close to being done when the internal meat temperature reaches around the 200°F range (aim for 203°F). |
| 8 | Allow the brisket to rest for at least 30 minutes to an hour. |
| 9 | Slice the brisket point against the grain. |
| 10 | Serve the brisket point with your choice of side dishes. |
1. Apply a Binder
Another optional step is to apply a binder to the brisket point before adding the rub. The binder will help the rub stick to the meat and prevent a patchy bark. For a binder, you can use either yellow mustard or olive oil. It will have no influence on the taste, but it will add a nice color early in the cook.
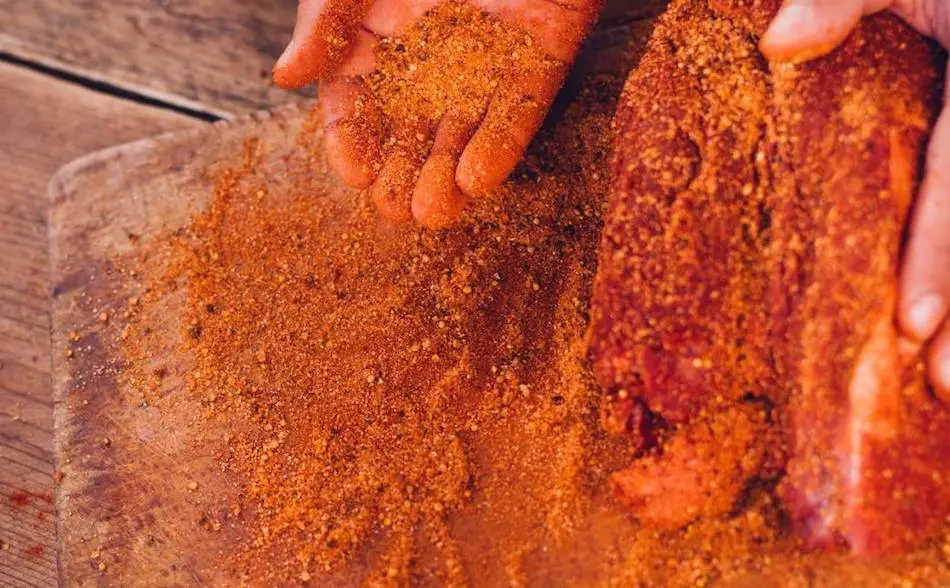
2. Apply a Rub
Sprinkle a thick layer of rub on the outer layer of the brisket point. The rub plays a huge role in the bark’s makeup, and the flavor profile. To season the brisket point, you can either use a simple salt and pepper combination or a barbeque rub. Aaron Franklin doesn’t use barbeque rubs on his briskets, but uses a Texas-style salt and pepper rub. If you use a S&P rub, make sure you use a good course black pepper, which makes for a nicer texture on the crust. Franklin uses a cafe grind black pepper and kosher salt on his briskets.
Store-Bought Rubs
You can use a store-bought rub, however, watch the salt content as it seems to be very high. This is especially important if you pre-brine your brisket. If you have applied salt to your meat, then used a salty rub. Your brisket will be far too salty. I make my own barbeque rub because it’s simple and gives me full control over all the seasonings. For more on brisket rub, check out this article where I show you all the best brisket rubs on the market, and the best homemade rub recipes used by championship brisket masters.
3. Set The Temperature of Your Smoker
Set the temperature of your smoker to 225°F. This is the standard low and slow temperature, and ideal for your brisket point. If you want to cook the meat a little faster, start off between 225°F to 250°F, then raise the temperature to 275°F after you have wrapped the point. However, it is much safer for the beginner to stick to 225°F because you have less chance of messing up your brisket point.
4. Wrap The Brisket
Wrapping the brisket point in foil or butcher paper is one of the most important steps in the cooking process. When you wrap the meat, it traps all the moisture inside and prevents the brisket from drying out. The other benefit is the meat cooks faster. You don’t want to wrap the brisket until the bark has set and is nice and firm. The way to test the bark is by touching the rub. If the rub sticks to your finger, then it’s not ready to wrap. When you’re satisfied with the bark, wrap in two layers of foil, insert a thermometer into the brisket, then place back into the smoker or finish in the oven.
5. Done Temperature
The brisket point should be close to being done as the internal meat temperature reaches around the 200°F range. The magic number is 203°F, to be precise. However, it is more important to go by feel rather than temperature. Your instant-read thermometer should only be a guide. Train yourself to know how a perfectly cooked brisket feels. The way to tell is to insert a toothpick or the thermometer probe into the meat. It should feel like butter when you poke the meat and give no resistance.
6. Resting Brisket
One of the most important steps is resting the brisket. Allow at least 30 minutes to an hour to just let the meat sit and relax the muscles. The brisket needs time to redistribute the meat juices. If you were to slice the point too early after removing it from the heat, you will lose the precious juices because they will spill out onto the cutting board.
7. How To Slice Brisket
When slicing, always cut against the grain. If you were to cut with the grain, the meat won’t be as tender. Only ever slice what you need rather than slicing the whole brisket point. If you have leftovers, it’s far better to freeze the meat as a piece rather than slices. Once you have sliced the brisket, most of the moisture will escape.
Hot and Fast Brisket
You can smoke hot and fast brisket in 5 to 7 hours, which seems crazy. The hot and fast brisket has become a huge trend in recent years. To cook a brisket this way, raise temperature to the 350°F range. The great thing about a hot fast brisket is the time. You can knock out a brisket in half a day compared to the whole day and half the night. If you try this method with a brisket point, keep in mind that it will not taste as good as a low and slow brisket. Because the brisket will spend less time with the smoker, it’s going to have less smoke flavor. The meat will also not be as tender because the connective tissue needs time at low temperature in order to break down.
How To Cook a Brisket Flat
Sometimes a brisket point isn’t available and your only choice is a whole packer brisket or a smaller flat. The brisket flat is the thinner end of the brisket and is the least preferred part. The flat is a lean muscle that contains very little fat, which makes it more difficult to cook. People often cook the flat in a pan with broth to prevent it from drying out.
Different Beef Grades – Select, Choice and Prime
Always buy the best beef grade that you can afford, because we often underestimate the importance of quality of meat. There are three beef grades; Select, Choice and Prime. The difference in grades is the marbling. A Choice and Prime brisket will have marbling present within the meat fibers, while Select will have little to no marbling. This makes a tremendous difference when smoking your brisket because marbling gives your meat flavor, tenderness and juiciness. Wagu beef is on a whole other level, and the reason it’s so expensive is because of the high marbling score.
Separate Point And Flat Before Slicing
It’s much easier to separate the two brisket muscles before you slice. The point and the flat need to be sliced in different directions because the grain doesn’t run the same way. When slicing meat, it’s always best to slice against the grain. This makes for a more tender cut of meat. The brisket point has grain the runs different ways, so the best way to slice brisket is to separate the point and the flat before slicing.
My Favorite Brisket Tools
Thanks for checking out this article. I hope you learned a few things. Here are some of my favorite tools I use when smoking brisket that may be useful to you. These are affiliate links, so if you decide to purchase any of these products, I’ll earn a commission. But in all honesty, these are the tools I recommend to my family and friends who are just starting out.
Meat Injector: Injecting meat is a great way to take your barbecue to the next level and help you make competition-style brisket. An injector is the only way you will be able to get flavor and moisture into the middle of the meat. The Beast Injector is a stainless steel injector that is sturdy and affordable. Check the latest price on Amazon here.
Brisket Marinade: The best injection solution on the market is the Butcher BBQ Brisket Injection. This marinade is used in competitions and is made by World Barbecue Champion pitmaster, Dave Bouska. You can find the marinade on Amazon here.
Butcher Paper: Wrapping brisket in butcher paper has become a huge trend in barbeque thanks to Aaron Franklin. Wrapping your brisket in paper will give you a nice brisket bark. However, you can’t just use any old paper, it has to be unwaxed, food grade paper. You can find it on Amazon here.
Brisket Rub: These days I make my own rub when possible, but I always have a few pre-made rubs for when I’m running low. Barbecue guru Malcom Reed produces Killer Hogs, one of the best brisket rubs I’ve found over the years. Another great rub is Slap Yo Daddy, made by brisket master and multiple World Barbecue Champion, Harry Soo.
Meat Thermometer: There are dozens of fancy thermometers on the market, but I still use my trusty TP20. For around $50, I have a high-quality meat thermometer with two probes, and can track the temperature of my smoker with one probe, and my meat with the other probe. The ThermoPro TP20 is an Amazon Best Seller because it’s the easiest thermometer to operate, is durable, highly accurate, and comes with pre-programmed meat settings.
Instant Read Thermometer: Arguably, the second most important tool you need is a fast and accurate instant-read thermometer. These tools play an important role in the latter stages of the cook when the meat needs regular checking in multiple areas. I use the ThermoPro TP19 because it can do everything a ThermaPen can do, but for a fraction of the cost. You can check out the TP19 on Amazon here.
Advanced Thermometer and Automatic Temperature Controller: Once you’re ready to take things seriously, the FireBoard 2 Drive is a six-channel Bluetooth/Wi-Fi thermometer that can monitor up to 6 pieces of meat, control and graph your cook sessions on your smartphone, and attaches to an an automatic blower that will convert your charcoal smoker to a set-and-forget. This is one of the most advanced meat thermometers on the market. You can check it out on the FireBoard website here.
Want to try something a little different? Ask your butcher about Tri Tip. How To Smoke a Tri Tip